![]()
![]()
![]()


The second part of Larry Horsfield's adventure writing tutorial gives us a basic outline of the first location in "Dawn Patrol", your very own adventure ...
Having obtained a copy of the Professional Adventure Writing System (universally known as PAW) from Gilsoft you can power up your Speccy and load it with the instructions relating to your version of the Spectrum. Before I start though it's important to note the differences in the system when using different types of Spectrum. If you have a 128K Speccy then load PAW in 128K mode, it will work perfectly well on a normal +2. However if you have a 128K +2A (the one with the black casing) or a +3 beware, you should not, at any time, select and use the Text Compressor, option K on the main menu.
Due to the different circuit board installed in the +2A and the +3, the text compressor of the tape version will not work. If you do try to use it while your database is loaded it may become corrupted. Gilsoft are aware of this anomaly but have not been able to remove the bug.
If you have a 3in +3 disk or 3.5in +D disk version of PAW make sure to read the instructions relating to making a backup of PAW. With disk versions you can save your database onto your 'working disk', and if you save it using the filename "START", your database will load straight away from disk whenever you load PAW.
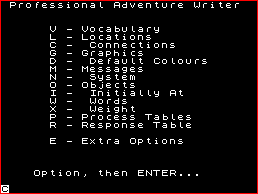
The first page of the main menu of PAW. Enter whichever function you need. |
O.K. PAW has loaded and the title page is on screen. Press any key to go to the Main Menu. You will find all the functions you need to create your adventure in this menu.
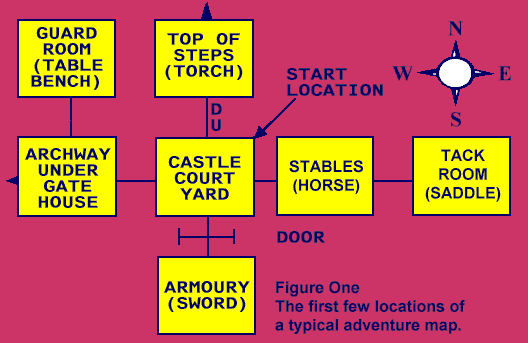
The adventure I'm going to teach you how to program is entitled 'Dawn Patrol' and consists of 8 locations, including location 0 which will be the "title page". The map of the adventure is shown in figure 1. The plot is as follows.
You are a soldier who is due out on mounted patrol in a few minutes. Some pranksters among your comrades have hidden your helmet and chainmail and you must find these before you can join the patrol. I will also be including flag manipulation and screen display techniques that are not given in the PAW tutorial adventure. So make sure you follow closely.
IMPORTANT: Throughout these articles I will be instructing you to input entries into PAW, be they locations, messages or responses/process table entries.
Everything to be entered will be placed within brackets: {}. The "I" in the first set of brackets instructs PAW to insert the entry into the database. In later articles I will dispense with the brackets and the "I", as by then you should've got the hang of how entries are input into your PAW database.
Let's start with the locations (which we will shorten to Locn). From the main menu, select L to enter the sub menu for location text. Locn 0 is already present and if you type {A 0} (Amend locn 0) you will see that a location text is already present. To clear this press EDIT twice. Any PAW adventure automatically starts at locn 0 and this is used as the title/introduction page. As we don't want the title to be on the very top line, we must insert a couple of blank lines. To do this, press EXTEND MODE then the 7 key followed by delete. You will see the cursor skip down one line. This is known as an ESCC7. Do this again to leave two blank lines at the top. Now press the space bar 10 times and then type the title {DAWN PATROL}. Now we want three more blank lines so repeat the ESCC7 inputs three times. Now for the introductory storyline, i.e. the plot.
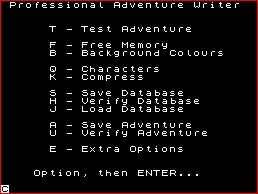
The further adventures of the PAW main menu. So much choice! |
Type the following in. Don't worry about words going onto the next line or there being a space at the start of any of the lines.
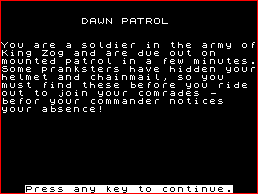
{You are a soldier in the army of King Zog and are due out on mounted patrol in a few minutes. Some pranksters have hidden your helmet and chainmail, so you must find these before you ride out to join your comrades - before your commander notices your absence! }
We must now insert the other 7 locns of the adventure so, from the locn Sub Menu enter I. You will see Location 1 at the top left of the screen and the cursor at the bottom left. Insert the text for the following locations, then if you type P you will see all 8 locations scroll up the screen.
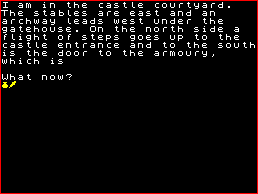
Locn 1: {I am in the castle courtyard. The stables are east and an archway leads west under the gatehouse. On the north side a flight of steps goes up to the castle entrance and to the south is the door to the armoury, which is }
Locn 2: {The armoury is a cool, dark chamber with all manner of weapons in racks on the walls. The door, north, is }
Locn 3: {I stand in the castle stables, with freshly laid straw underfoot. An opening leads east into the tack room and the courtyard is to the west. }
Locn 4: {This is the tack room, where racks and pegs hold all kinds of horse riding equipment. The stables are west. }
Locn 5: {At the top of the steps is the entrance to the castle itself. Two soldiers stand here on sentry duty, holding long halberds crossed in front of the open doorway. I can see the throne room north and behind me the steps lead down to the courtyard. }
Locn 6: {Under the gatehouse archway I can see, further to the west, the horse patrol I am supposed to be part of. A low doorway leads north into the gatehouse, and the courtyard lies east. }
Locn 7: {This spartan chamber is the guard room. The only comforts are a bench and table, and a fire that burns merrily in the hearth. On one of the walls is a large notice. }
The first ever adventure message you will produce. Well done. Have some tea. |
You will notice that locn's 1 and 2 are missing a word at the end of the text. This will be printed on-screen when the adventure is running and I will detail how this is done later. You can also see that I have put a blank space at the end of each locn of text. This is because of messages which will be tagged on to the end of each locn text. Note that I also ALWAYS put a blank space at the end of every message I insert into a database and for the purpose of this tutorial you should do so as well.
Having inserted the locations, we must now insert the connections between them so that we can move around. This is done in the connections table for the locations where we can freely move around, but from the title page to location 1 we need an entry in PROCESS table 1. Movement into and out of the armoury, locn 2, is dealt with in the RESPONSE table, and this will be dealt with later. Process table 1 is scanned by PAW every time you move into a new location, or a DESC action is acted upon. From the locations Sub Menu, type Z to get back to the MM and then select option P, the process tables.
The first process table you go to is Process (PRO) 2, which PAW scans after each input from the player - in effect it is PAW's "go" at the adventure!
We need, as I said, to put an entry into PRO 1, so select that process table by typing S 1 and pressing ENTER. If you press P you'll see just two entries in the table, which deal with displaying objects on the screen according to whether it is dark and the light source that is available - more on that later.
Before I go on, I must tell you about the "null word" symbols used in PAW, these being the asterisk symbol "*" and the underline "_" symbol - this latter has another use which I'll mention later. The "*" will always be placed BEFORE any vocabulary word used in PAW and the "_" symbol. This symbol will appear AFTER the "*" or a word. The positioning of entries in the response/process tables of PAW is often very important. You can use the null words to place entries in a certain position so that they will be acted upon in preference to other entries if necessary. This will be illustrated later.
The second part of the first ever adventure message you will produce. |
The two existing PRO 1 entries are "*_". The entry we need to insert into PRO 1 should go AFTER these two, so we use the same symbol. So, type I (for insert) followed by an asterisk then a space then an underline symbol, i.e. {I * _} then press ENTER. What you typed will now be at the top left with the cursor at bottom left. The entry we need to insert is as follows: {AT 0 ANYKEY GOTO 1 DESC}. This means that at AT location 0 the program should wait for ANY KEY to be pressed, then to GO TO location 1 and DESCribe that location. If you have typed that correctly, press ENTER. The word "Inserted" will appear top left under the "I *_" and you should press any key to return to the SM.
Now press Z for the MM and select option C for the connections table. If you screenprint the table by pressing P, you'll see that blank entries are present for all locations. Ignoring location 0, we'll insert the connections from loc 1, so type {A 1} and press ENTER. Consulting the map or reading the text for locn 1, you can go east to the stables, west to the archway and up the steps.
On the map I have indicated there is a door that leads south to the armoury and initially this door will be closed. Also, I intend that the armoury will be a dark location, where you will need a light source to be able to see, and therefore going south from location 1 and north from location 2 will be dependant on two of the FLAGS which PAW uses.
So, the connections entry for loc 1 will be: {E 3 W 6 U 5}. Below are listed the entries for the other locations, except for locn 2 which will be dealt with later:
Location 3: W 1 E 4
Location 4: W 3
Location 5: D 1
Location 6: E 1 N 7
Location 7: S 6
You will also notice there is no entry for going west from location 6, nor for going north from locn 5. This is because the player can only go west to join the patrol on the horse, and the sentries will stop you going north into the castle. Having entered all those connections, we can at last test the adventure. Go to the MM and select option T to test the adventure. You will be asked if you require diagnostics, but just press ENTER. On the title page, you are instructed to "PRESS ANY KEY TO CONTINUE" and doing this will take you to location 1, the castle courtyard. From here you should be able to move into any location except the armoury. To break out of the Test Adventure mode, input QUIT then follow the prompts to return to the MM.
Before we deal with the movement into and out of the armoury, we must insert the messages that we wish to appear on screen in response to the player's inputs. This is where we'll pick up the story next month. In the meantime get yourself a copy of PAW and try out what we've done so far. I hate to sound like a school teacher but if you don't understand what we've done up 'till now you'll start getting lost next month.
Remember PAW is available from Gilsoft, South Glamorgan. It costs £9.95 as a tape starter pack with manual and is also available on +3 and +D disks and £20.95.
By Larry Horsfield
Previous article in series (issue 128)
Next article in series (issue 130)
![]()
![]()
![]()